Those old, yellowish recessed spotlights in your ceiling. You know the ones. They guzzle energy, one has been flickering for weeks, and the heat they give off could warm a small country. You know it's time for an upgrade to fresh, energy-efficient LED spotlights. But where do you start? How do you know which new spot will fit into that old hole?
Does it sound like a complicated job? Don't panic! Replacing recessed spotlights is much easier than you think.
The Preparation: Measure Twice, Cut Once
Before you enthusiastically click new spots into your shopping cart, it's time for a little field research. Good preparation is half the battle and saves you a lot of headaches.
Step 1: CUT THE POWER!
We start with the most important step of all. Go to the fuse box and turn off the power to the relevant group. Not sure? Then switch off the main circuit breaker. Safety first, always.
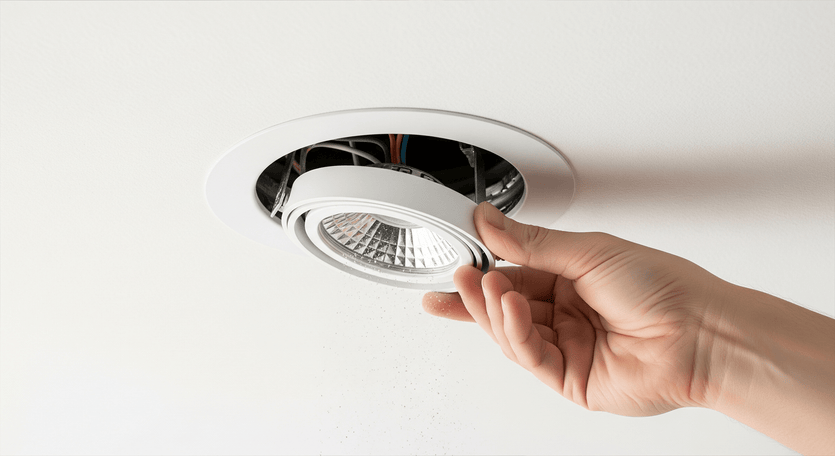
Step 2: Freeing the Old Spot
Carefully pull the old spot partly out of the ceiling. You'll feel some resistance from the clamping springs on the side. Squeeze these springs together and pull the spot completely out of the hole. Let it hang by its wiring.
Step 3: The Great Measuring Task
Grab your tape measure; this is the moment of truth.
The Cut-out Size (Sawing Size): Measure the diameter (the cross-section) of the hole in your ceiling. From one edge to the other. Write this number down. This is the most important measurement you need.
The Installation Depth: Now insert the tape measure into the hole, straight up, until you hit an obstacle (e.g., a beam or the concrete ceiling). This is your available installation depth. New LED spots are often shallower, but it's crucial to know how much space you have.

Step 4: 230V or 12V? Spot the Transformer
Look at the wiring.
230V: Do you see a relatively thick cable (often in a grey sheath) that is directly connected to the lamp holder of the spot? Then you likely have 230V. Easy!
12V: Do you see thin wires running to the spot and is there a square or rectangular box (the transformer) somewhere above the ceiling? Then you have a 12V system. Be aware, this requires extra attention!
Choosing the Right New Spot: Your Choice Menu
With your measurements in hand, you can now choose the perfect replacement.
-
Your cut-out size is a standard size (e.g., 75mm):
Great! You have a wide selection of new spots with the same cut-out size. Just double-check if the installation depth of the new spot fits. -
Your hole is too large for the new spot:
No problem, here's a magical solution: a reducer ring (also called a renovation ring). This is a flat metal ring that you place between the ceiling and your new, smaller spot. It perfectly and seamlessly covers the old, oversized hole. -
You have a 12V system:
Beware! Old halogen transformers often don't work well with energy-efficient LEDs. They require a minimum load that you won't reach with just a few LED spots, which can lead to flickering or humming. The best solution is often to remove the old transformer and switch to 230V GU10 spots. This is usually simpler and more reliable.
The Step-by-Step Plan: The Installation
- Safety Check: Is the power really off? Good.
- Dismantle the Old Spot: Disconnect the wiring from the old spot.
- Connect the New Spot: Connect the wiring to your new spot. For 230V GU10 fittings, this is often a matter of inserting the blue and brown wires into a terminal block or Wago connector.
- Install the New Spot: Squeeze the clamping springs of your new spot together, push it into the hole, and release the springs. Click. The spot now clamps itself against the ceiling.
- Time to Test! Restore power and admire your work. What a difference!
Job Done!
And it's that simple. Replacing your recessed spotlights is a project that delivers immediate results: a nicer look, better light, and a lower energy bill. By measuring well beforehand and making the right choices, this is a job you can confidently do yourself.
Still have questions about that tricky transformer or a non-standard cut-out size? Our lighting experts are ready to help you overcome the last hurdles.